
Making
‘Making a book from start to finish is tremendously empowering. You get to choose exactly how it will be…. You get to effectively self-publish! Imagine that? Binding a series, collected together on a shelf, makes a library!’
Rachel Hazell Bound (2018)
‘The book also unifies art and language, for both forms exist one inside the other. One sees the art through writing and the writing through the art.’
Paul Johnson A Book of One’s Own (1990)
Sometimes it can be liberating to experiment with what writing takes place in or on.
Below you can find instructions for making :
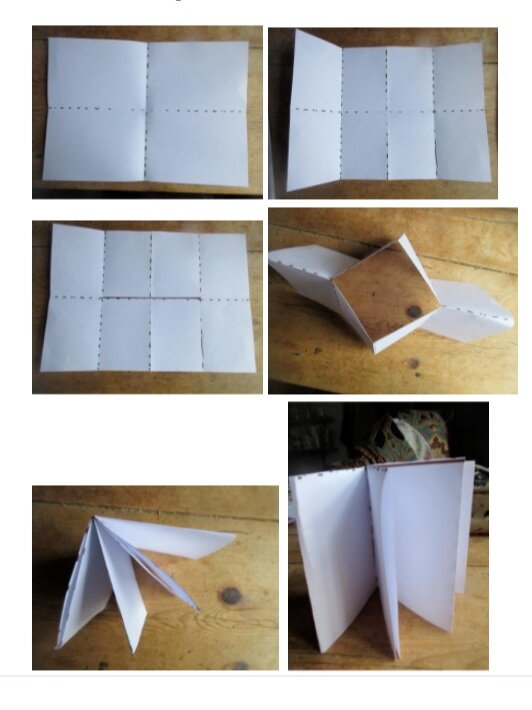
simple folded book
Take a rectangle of paper – A4 will do. A3 is ideal for younger children, A5 produces fairy sized books.
Fold in half from top to bottom. Unfold. Fold in half from side to side.
Unfold. Fold sides to middle to create eight sections.
Cut the central fold as shown on photo 3.
Fold along the horizontal line and pinch together the outside pages, pushing them towards the centre. You may have to fold the creases in both directions to sharpen them.
Fold the pages over to form the book.

simple flip books
To make 30 flip books, simply take 30 pieces of A4 paper in assorted colours.
Cut paper into four equal horizontal widths, shuffles and assemble four-leaf (8-page) booklets.
To hold them, tightly multi-fold the 'spine' (as in photo), or staple.
This format provides many ways of playing with language combinations. (Read Nick Sharatt's 'Ketchup on your Cornflakes?’)

small books
The white sheet is folded into 8 equal rectangles, and then torn or cut three-quarters of the length down the middle. This allows it to be folded, and later inserted into the pink cover.
The pink cover is made by first taking the shorter edge, aligning it just 2 mm short of the opposite edge, and folding it flat. Open it out, rotate the paper 180 degrees and repeat the process so that there are two parallel creases in the middle of the paper, about 2 mm apart. This will later form the spine. Now, open the paper out and fold it along its length so that each edge is about 1 cm short of its opposite. Finally take one of the narrow edges and align it 2 mm short of the nearer centre fold. Press down and crease. Rotate the paper 180 degrees and repeat with the other narrow edge.
To assemble the 'book', slide the outer pages of the white sheet into the pouches created by the folds of the pink sheet. The 2 mm gaps should allow sufficient space to slide the white paper in, and not leave the book too loose.


People-shaped book 1
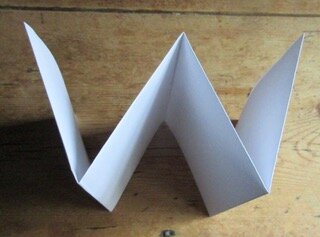
Take a piece of A4 paper, or A3 if you would like a larger book. Fold it in half in landscape position.
Fold into a zigzag (concertina) book: in half and sides to middle to create a four page zigzag.
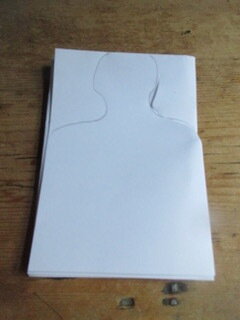
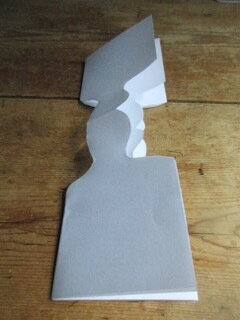
Fold it so all the pages lie together and cut a head and shoulders shape from the upper part of the page. Cut through all pages at once. TAKE CARE to leave a section of fold at the top so that the pages don’t come away separately. It means that your person, inevitably, has rather a flat-topped head. Make sure there are side folds as well, otherwise you will have a set of separate paper dolls. You can sketch out the shape in pencil if you like.

Person-shaped book 2
Having followed the instructions above to make a basic person-shaped book, you may like to add a lift up flap so that you can write beneath the flap as well as on top. Maybe here is the place for inner thoughts or hidden feelings.
Open out the folded pages so that you have the whole page and fold that into a zigzag again, along the vertical folds. Place the book so that the front sheets are at the bottom, facing you and the back sheets upside down above them. Cut two slits through the pile of folded front sheets to make a lift up flap.
Refold the book in its original zigzag.

People-shaped book 3
If you would like a folded person with legs, start as before with an A4 sheet of paper placed in landscape position. Fold the top edge down but not all the way. Leave a margin of about 5cm at the bottom. This is where you will cut the legs.
Now fold the book as a zigzag and cut head and shoulders from the top section, as before, remembering to keep a fold at the top of the head so the pages stay together.
Unfold and refold the book as before and cut the slits in the upper sheet to create the flaps. Fold back to the original book form. Cut the legs and feet from the single layer at the bottom of the book. Cut the legs quite wide and make the feet substantial if you want the book to stand up.
I cut the legs last so that it is less fiddly to open and refold the book in order to cut the flaps.
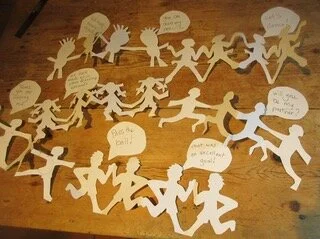
DANCING dolls, gormley style
You probably know how to make dancing doll chains. You take a strip of paper and fold into a concertina and then cut out your dancing doll. The figures must join at the hands and possibly the feet also so that they stay in a chain. They are usually quite stiff little figures with stiff outstretched arms and a pair of straight legs. During the first lockdown, last year, First Site Gallery in Colchester created a really imaginative collection of ideas for making, inspired by contemporary artists. Anthony Gormley’s contribution was to suggest we make dancing dolls. But his cut out figures stretched and lunged, jumped and leaned over: a great innovation and they make an entrancing display.
The figures could be decorated with words or speech bubbles.
Making a paper staircase for writing
Simon Wrigley explains how to make folded paper steps - and gives examples of the kinds of writing they might be used for.

PAPER BOX
Take a piece of A4 paper. Fold in half from top to bottom in portrait position. Keep the folded edge at the bottom. Fold the top half down to fold in half again.
Fold the top corners down to meet the bottom edge to make diagonal creases. Fold the bottom corners to the top edge to make two more diagonal creases.
Where the diagonal creases end, fold left and right edges towards the middle panel. These folds create the square sides of the box. Unfold the sheet so that it is just folded in half once.
Fold down the top corners on the front sheet. Fold up the bottom corners. Fold the top half of the sheet down. Pull the front section forward to make the box shape. Bring the last section forward to complete the box shape. Tuck the triangular flaps into the diagonal pockets on either side of the box.

SLIPCASE FOR ORIGAMI BOOK (SQUARE)
Take one sheet of A4 paper. In landscape position fold it into three. An easy way to do so is to place a ruler diagonally across the sheet of paper so that it measure a multiple of three. In this case, twelve inches. Mark the paper at 4 and 8 inches to guide your folds.
Fold the left hand panel behind the sheet. Fold the corners on the left to the vertical crease to create diagonal folds. Fold the sheet horizontally using the edge of the folded triangle as your guide. You are creating the narrow gulley that will hold the book. Fold the left panel forwards over the right panel.
Pull the pocket forwards to make it into the slip case.